Saturday, July 18, 2015

Special Ed Blog Hop- Week 4 Working with Paras


Welcome to Week 4 of the Special Education Back to School Blog Hop! We have covered scheduling, how to set up your classroom, and back to school forms. This week we are talking about one of the most important and (maybe) difficult part of being a special educator- working with paraprofessionals.

Many new sped teachers can find it difficult to not only be in charge of a caseload, but also other adults. Directing other adults who may be older than you in a job that is new to you is tricky. I am very lucky to have paras in my classroom whom I genuinely get along with. I believe that a few key things have made our working relationship, well... work.
1. Training- I invite my paras to come by school before the first day. I say "invite" because I can't require them to be on campus before their contract starts. My paras are awesome and have come each time I asked. I think they appreciate the heads up for the year. During our training we go over the basics for the year- class schedule, their individual schedule, the classroom layout, and student goals/work. We also go over our Para handbook. I use this one from Mrs. H's Resource Room. It covers the basics like chain of command and being on time, but I love that it also covers how to model appropriate participation and appropriate responses to behavior. It's not too long and it has great information. Remember, most paras don't have degrees in special education, so it is up to us to train them.
2. Clear Expectations- My paras run centers and I lay out direction for what I want them to teach. I tell them what goals they should be working on and give them materials to hit those goals. That being said, I do give them a little flexibility if the plans aren't working. I trust my paras to adjust the lesson or change up the materials if the kids just aren't going for it.
3. Organization- Nobody wants to work in a confusing or messy environment. Not knowing what you should be doing or where to find the things you need is stressful. Make sure you set your paras up with all of the tools they need to complete the job you laid out for them.
4. Communication- I have quarterly meetings with my paras. Some times we throw in an extra meeting here or there if we have a new policy, behavior procedures, etc. I create an agenda for the meeting to make sure that I cover all of the details that we need to discuss and refresh. I try to make sure that my paras know that they can come to me with concerns, ideas, or if they are starting to feel burnt out.
5. Appreciation- My classroom could not function without my paras and sometimes their jobs are less than glamorous (toileting, anyone?). Make it a point to tell them that they are a valuable part of the classroom. Everybody needs to feel appreciated and are more likely to work hard when they do. A thank you will go a long way!

How do you set up your paras for success? Check out Breezy Special Ed for some more great tips on working with paraprofessionals.

Breezy Special Ed

Saturday, July 11, 2015

Back to School Blog Hop Week 3- Back to School Forms


Welcome to Week 3 of the Special Ed Back to School Blog Hop! This week we're talking all about Back to School Forms.

Back to School Forms can be many things: IEP organization, classroom forms, or forms used on Meet the Teacher Night. I'm going to tell you about my Meet the Teacher Night forms plus an awesome freebie!

I teach in a self-contained classroom and the majority of my students are kindergarteners. If you've ever been in a kindergarten classroom on Meet the Teacher Night, you know how crazy it can get. Parents are nervous. Kids are nervous. Teachers are nervous. Some of my kiddos have pretty extensive needs and parents feel like they need to tell me everything about their child right then. I TOTALLY get it. Some parents have never met me and I can only imagine how hard it is to trust a nonverbal 5 year old with someone you don't k now that well. To try to slow down the madness, I have created Meet the Teacher Stations. It helps keep everyone organized. I can make sure that I have all the forms filled out and that I have been able to talk to each parent with as little chaos as possible. I also have a few moments to sneak in hugs to former students or students I'll have again. And let's face it, that's the best part of the whole night.

I use 5 Simple Stations:
1. Sign In- I have everyone sign in. That way, I know who came, who picked up required forms, and I can get an email address for parents.
2. All About Me-I write a little 20 questions about myself to help students and parents get to know me better.
3. Transportation- This is the most important one in my opinion. Parents circle how students will be getting to and from school each day. Not knowing where a child is supposed to go at the end of the day is terrible. I don't wish that feeling on anyone. This little step can save you a big headache later, trust me.
4. Folders- Parents and students pick up their Take Home Folder at this station. Each one of my students has a take home folder for homework and daily communication logs. On Meet the Teacher Night, I include all school forms, my Class Info Packet (syllabus), and a student information sheet.
5. Classroom Tour- A the 5th station, I invite everyone to tour the classroom and find their desk. This is also a great time for parents to get some 1:1 question time with me and a cute picture of their student.

Now for the freebie! Grab my Meet the Teacher Station Signs and basic forms for free. Click here!

Head over to Breezy Special Ed for more Back to School Form ideas!
 Breezy Special Ed


Saturday, July 4, 2015

Sped Summer Blog Hop Week 2- Classroom Set-Up


Welcome to Week 2 of the Special Ed Summer Blog Hop! This week me and my fellow special educators will give you tips on how to set up your special ed classroom. Now that you have your schedule all worked out, you need to find places where all that magic can happen!

Here are my 5 tips to setting up a rocking self-contained classroom:
1. Schedule requirements- What in your schedule needs a specific place for it to happen?
     For my classroom, I need 9 student desks for whole group lessons and independent work, 3 kidney tables for small group work and centers, 1 rectangular table for workshop, and 2 cabinets for storage. I wish we had chairs at each station, but you can't have it all, right?!
2. Permanent items- What cannot be moved around?
    Your furniture placement is going to depend on the space you have available. My classroom has backpack hooks, a classroom suite door, a Smart Board, an angled wall, a teacher desk, and a section of tile with a cabinet and sink. Basically, my classroom is a giant square which makes organizing it really easy to set up furniture.
3. Roadways- Is there enough room to easily move around? Do any students use wheelchairs or walkers that need extra space? Is traffic flow clear and understandable?
    I have 4 students with wheelchairs and 1 with a walker. It is important to make sure that they can comfortably maneuver and that there is also room for additional staff to sit with them. We use center rotations for most of our academic work. Students rotate in a circular pattern, so, I do my best to make sure that there is a clear pathway to each center.


    The pathway from the blue to the red table is the most difficult because it isn't straight, but the students get used to it. In the beginning of the year, I put color coded duct tape on the carpet to remind students where they are going. I'd rather waaaay over do it with visual supports in the beginning of the year and scale them back then find out the hard way that they need more. Can you say rookie mistake?
4. Double duty storage- What materials do I need to access at each work space?
  I like my storage to pull double duty. The cabinet in between the green and blue tables holds materials I need for those centers and serves a divider between the tables. The division helps to clearly differentiate the centers from one another and limits distractions. The back of the red table cabinet is my staff command center (read more about this next week for my Working with Paras post). In short, this area is used my my paras, therapists, admin, and anyone who needs quick info about us!
5. VISUALS!- Say it with me... visuals! Visuals should be your best friend when setting up your self-contained classroom. Visuals let your students know where to find/put items, where they should be going, what you expect them to do, and give them opportunities to communicate. I am a visual addict. I'm going to assume that most special educators know about visuals and have their system of using them. That being said, I am going to list sometimes forgotten visuals that I use in my room:
                 -Footprints on the floor or some type of line-up visual
                 -Stop signs on doors to stop runners
                 -Cafeteria line sequence visuals
                 -Bathroom sequence in independent bathrooms
                 - Class Jobs description sequences


Remember, well defined spaces clarify student expectations. 

Breezy Special Ed
Check out Breezy Special Ed for more tips on setting up your special ed classroom!

Saturday, June 27, 2015

Summer Sped Blog Hop Week 1: 8 Steps to Schedule Sanity


Welcome to the first post in the 6 week Back To School series for Special Education! This week is all about scheduling. Scheduling in the special ed classroom can be seriously tricky. Special Ed classrooms typically need to fit in reading, math, and other standard academics as well as social skills, life skills, physical therapy, occupational therapy, speech therapy, and a million other things. Having a consistent and efficient schedule is the first step in creating a comfortable learning environment. Sitting down to write a schedule for your special ed classroom can seem like a daunting task, but myself and some other fantastic sped bloggers have put together tips and tricks to help you get started!

The following tips are strategies I use to create a color coded, puzzle worthy schedule in my self-contained cross categorical classroom for students with mild to severe cognitive disabilities. I start with a basic class schedule and then make the master student schedules. 

  1. Academic Essentials- Your schedule is going to have some essential components. Think IEP minutes. You know Student A needs to receive 60 minutes of daily reading instruction. Write that down. Write down all of those essential components for every student. It is going to be a looooooong list, but don't worry.
  2. Permanent Fixtures- Open up a spreadsheet program like Excel. Make a simple spreadsheet that shows time (I use 15 minute intervals) in the rows and student names in the columns. Block out chunks of time for elements that you don't have control over their time. For me, this is things like lunch, Early Release Wednesdays (new this year.... yay!), and specials. My kids go to specials with their grade level and an aide, so, you'll see blocks of time for specials occurring at different times for each student. If your students all go to specials at the same time, I envy you so hard.                                                                                                                          
                 
        
  3. Moving Must-Haves- These are schedule items that are essential each day, but you have control over their timing. These essentials are going to be different for each class. I teach in a self-contained classroom for young kiddos and the overwhelming majority of my class (10/11) wear diapers and/or having toilet training goals.  So, toileting is a big deal for us and has to be carefully scheduled into each day. Other examples of Moving Must-Haves are recess, choice time, Circle Time/Morning Meeting, or data collections time. Add these items to your schedule next.                                                                                                                                                                                                                           

  4. Groups- Grouping students can seem like a puzzle within the puzzle of scheduling. There are a few different approaches to grouping students. Some teachers group students by abilities like reading levels. Other teachers group students by like goals. And some group students by meshing personalities. All of these approaches have their merits and some work better than other for particular students.  Personally, I like to group students by like goals. My kiddos are young and small groups flow better when we are all working on the same thing. In the event that I have more students with a like goal than I like in a small group, I look to behavior next. Every class has those 2 kids that will kill you if they are in a group together or students who more direct attention in a small group than others. I make the groups on the side of my schedule so that I can easily copy and paste them into time slots. 
  5. Plug It All In- I have a love/hate relationship with this part of schedule writing. It's a giant puzzle and the page starts to fill up which I love, then 10 minutes in, my brain hurts and I need chocolate to keep going. I have a feeling I'm not alone on this one. So, I write down all of the academic components I want to hit each day- math groups, workshop, phonics groups, teacher table, etc. Then I assign a time limit for each item. We do math groups for 30 minutes, but teacher table is only 15 minutes. I try to do them time blocks that are factors of the time interval on my spreadsheet. Trust me, it works out much pretty this way. Start plugging in your groups                                    
  6. Color-Coding- The fun part, making it pretty. Color coding the schedule serves more purpose than aesthetics. I assign a color to each adult in the room and a color for when all are involved. Next,, fill in the box that each adult is responsible for with their color. This can save you from 2 major mistakes, creating more groups that adults in the room or "double-booking" a therapist or para.
       
  7. Adult Schedules- Next I make schedules for all of the adults in my room. The first week of school is mostly about getting scheduling down for my students and adults, so it is nice to have a little cheat sheet until it becomes routine.
  8. Empty Spaces- You will notice that there are some blank spaces in some areas. I always leave a little wiggle room so that when therapist come to me before school looking for scheduling opportunities, I'm not redoing the schedule each time. Granted as pretty as the schedule looks, I know that it will change. Things happen, but having a solid starting point makes the tweaking later MUCH easier and less stressful for you and everyone involved. Check back next week for tips on setting up your classrooms!

How do you piece together your schedule puzzle? Click on the link below to continue on the hop and get some more scheduling tips from fellow sped bloggers!

Breezy Special Ed


Wednesday, June 24, 2015

One Lovely Blog Award


Thank you so much to Lisa from All Things Special Ed for nominating me for the One Lovely Blog Award! I'm super new to blogging and it's crazy that she would even think of me! I felt totally unprepared for my first year of teaching despite having a great student teaching experience. The Special Education teachers that I found through blogging totally saved me and gave me confidence. I am truly grateful for the ideas, products, and insight I have found! Hopefully I can one day be helpful for a new special education teacher.

According to the award rules, I am now supposed to tell you 7 things about me. Here goes!

1. I live in Arizona about 45 minutes east of Phoenix.
2. I teach in a self-contained class for kiddos with a wide array of disabilities. I have kids with mild, moderate, to severe/profound disabilities. The wide range can be challenging sometimes, but I love that it really pushes me to be creative!
3. If I weren't a teacher, I would probably be a nurse. I secretly want to be a Midwife :)
4. I am getting my Masters in Applied Behavior Analysis and will go for my BCBA.
5. I dream of opening a therapy and education center for for kiddos with developmental disabilities.
6. I love to cook, but hate following recipes. My great little family will always taste my creations even though I am definitely not successful every time! 
7.  I need to make more time for creating projects and blogging, but it's a struggle to stay up past 10 haha. 


I want to nominate blogs that helped me develop a (mostly) successful classroom:

Friday, June 12, 2015

Morning Workbooks

I have really struggled with finding age AND skill appropriate morning work for my kiddos. My students aren't writing yet, so worksheets are out. (Honestly, I have never used worksheets in my class. I just don't feel like they work for my kiddos.) We've tried a few different things like puzzles and work tasks, but I would like something a little more skills based. I chose to make Morning Workbook Binders for my students who are able to use this type of system and Morning Tasks for my kiddos working on my eye-gaze and gross motor skills. The skills included are skills that they have been working on, but may not be mastered yet or mastered skills that work on independence.

My workbooks break down into 5 basic categories (1 student has 6... he's learning to READ!!):
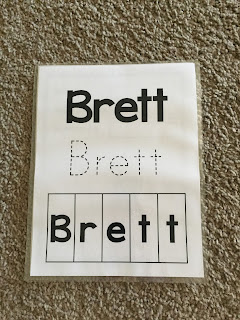
1. Name- These pages focus on reading their name, tracing their name, and then spelling their name by matching letter tiles. The more advanced page gives students the letter tiles, but they spell it independently.


2. Letters- Students match uppercase to uppercase, lowercase to lowercase, or upper to lowercase. I change out the pages as their skills develop.


3. Numbers- Students match number 1-10 and then trace 1-10. On the more advanced page, students match a number to a quantity as well as tracing.


4. Colors- Students start by sorting/matching red, blue, green, and yellow circles to 4 large corresponding color squares. When the students match this skill, we will move on to the student matching the same colored circles to the color word. The word is printed in it's corresponding color. Finally, when this skill is mastered, the student will match the colored circles to the color word printed in black and white.


5. Calendar- Students will match the Today Is, Yesterday Was, Tomorrow Is, Month, and Season. The correct answers are listed on the board and are changed by the Calendar Helper.


6. Lastly, Sight Words- This one really excites me. One particular rockstar student of mine came to me last year knowing 4 letters- all uppercase. By March, he knew all 52 letters by name and sound with about 90% accuracy! He is such a hard worker and I can't wait to see what he can accomplish this upcoming year! This page starts with students simply matching the sight words that we will focus on during reading instruction time.


These will be used first thing in the morning. The students come in, unpack and then get to work. My paras walk around assisting students as they need it, but the goal is independence. This gives me time to take attendance, take data, or take care of little things.

Do you use Morning Work?


Thursday, June 4, 2015

How I'm Stepping Up My Mom/Housekeeper Game This Summer


I'll put it out there--- I am NOT a good housekeeper. I am always playing catch-up with my chores instead of staying ahead of the eight ball. I am forgetful. I NEED HELP.


What motivated me to make a change? My daughter has her dance recital on Saturday. (She's only 2.5 so she could care less, but it will be a cuteness overload). Her dress rehearsal was last Wednesday- a whole week and a half before the performance. Does the teacher really think a group of 2-3 year olds will remember a routine after 10 ten with no practice? Anyway, I digress... Tuesday roles around and the peanut and I go to the dancewear store to pick up the very specific shade of tights she needs for the recital. A day AHEAD of schedule. Check me out. Now, it's Wednesday night. The peanut is getting her bath and getting ready for bed.      Wait.       Wasn't there something I was supposed to do today? OH CRAP!! No, we did not make it to the rehearsal. Why? I forgot it. I always forget. I blame it on my thyroid disorder, but that's another story.  I immediately text her dance teacher and apologize up and down. She promised that it was okay, but I felt terrible. I immediately knew that I had to get a handle on my home life. 


The next morning I set out to get this business organized and like any good teacher would do, I made lists. Multiple lists, a calendar, and a schedule.  I've read that it takes 27 or something days for something to become a habit, so I'm getting starting now. When school is back in session, it should be engrained in my routine. Fingers crossed. Here's what I came up with:

  1.  Calendars-- I finally got one of those big family calendars that I publicly mocked but silently envied on pinterest. It's hanging in our kitchen and it. is. huge. Don't worry, the recital is on there in bright red, bold letters. I included all of the due dates for our monthly bills, too.
  2. Cleaning Schedule-- Seriously, I hate the thought of having a cleaning schedule, but I need something to keep me accountable. I am finding that I really like knowing that everything will get done. It kinda takes the pressure off. I created 3 schedules:
    1. Daily schedule: Dishes, Kitchen Counters, 10- Minute Tidy Up
    2. Saturday: Daily tasks, Laundry, Sweep/Mop
    3. Sunday: Daily tasks, bathrooms, vacuum, dust
  3. I'm entertaining the idea of a monthly or deep cleaning schedule too, but let's not get ahead of ourselves here.
  4. Meal Planning-- We've been meal planning since March when we decided to take the Gluten Free plunge. I LOOOOVE meal planning. Something about it makes me feel so productive. And, let me tell you, it makes grocery shopping with a toddler so much easier. We get in and out of the store fast, my aimless wandering of the aisles and gross overspending has greatly decreased.  Another plus is that it gets rid of the "what's for dinner?" question from the hubs every night. Read the fancy calendar, man!

So, friends, this is my goal for the summer. Get my house in tip top shape. Do you have any non-school goals this summer?


Wednesday, June 3, 2015

Task Boxes- Not Only For Autism

I am a special educator who uses task boxes, but I do not teach in an Autism-specific classroom. My class is cross-categorical and my students have a variety of disabilities, but the majority of my kiddos have Down Syndrome or similar developmental disabilities. A simple online search can get you a huge amount of resources for students with Autism. Finding educational resources specifically for students with Down Syndrome is not always as simple. I usually spend my hours combing through some awesome Autism resources and find gems that I can use with my kiddos.  My favorite thing about using resources for students with Autism in my class is that they focus heavily on building independence skills. Building independence skills has to be one of our top goals for our students. Some of my most treasured finds are the leveled work books from The Autism Helper and the social stories from Simple Special Ed. In an effort to build independence skills in my kiddos, I implemented another Autism classic- the TEACCH task box. My students LOVE LOVE LOVE them! I've started them off with simple fine motor skills, put-in tasks, and assembly tasks. Slowly I've moved my more advanced students to more academic tasks that they have previously mastered.
Getting started was really difficulty for everyone involved- myself, my paras, and my students. My students are mostly kindergarteners (my class is k-3) and are still young. Being so young, they don't have tons of experience completing things by themselves. Training them to complete a task start to finish in one sitting was difficult. In the beginning, there was a lot of wandering, misusing materials, just plain sitting. I found that it took A LOT more reteaching of the concept that I thought it would. When students would leave the work station, I would bring them back, show them the visuals and then step back to see if they needed more direction. It took us a solid 9 weeks to get in the groove, but they are really getting the hang of it. I have loved seeing them become more independent and the best part is that the skills are totally translating to other parts of our day. I notice that some students are needing less help in the cafeteria or bathroom. Their attention spans are slowly increasing during small groups and I really feel like they are happier during work time.

Long story short.... try task boxes. Think outside the "this is an Autism strategy" box. Our job is to foster independence and this has been my most successful way to accomplish that. 


Tuesday, March 10, 2015

The Need for Positive Narratives in Young Special Needs Classrooms


What is a positive narrative?
Positive narration is a classroom management technique where the teacher highlights appropriate behavior out loud during instruction therefore minimizing inappropriate behavior. For example, "Marissa is doing a great job keeping her eyes on the teacher." or "Wow! I love how Lexi is cleaning up so quickly." The teacher ONLY highlights the positive behavior. Think of it as an extension of the old adage "praise in public and punish in private." These statements can be easily woven into instruction and, if used consistently, weave naturally into conversation.

Why use positive narratives?
For the most part, our students want to please us but every teacher knows that not every student knows the appropriate way to show it... especially in the special education classes. For many students, appropriate behavior in any setting doesn't come naturally. They need explicit instruction on how to act, where to stand, what to say, etc. By consistently narrating the appropriate behavior, you are helping your students learn what they should be doing. Students may still need explicit instruction on appropriate school behavior, but highlighting good behavior in context is incredibly meaningful. When students not showing appropriate behaviors listen to their peers get acknowledged for great behavior, their natural inclination is to observe and copy. 

Benefits of positive narration:
  • creates a positive atmosphere
  • builds student moral- students love getting their name called for good behavior
  • teaches appropriate behavior in real life context
  • negative behaviors become less frequent


Wednesday, January 28, 2015

Phases of Your First Year

I don't think that any amount of training can really prepare you for your first year of teaching. All of the behind the scenes, the paperwork, parents, THAT kid. I'm a preparer. I like to research every detail before I begin something. Teaching was no different for me. I scoured Pinterest for classroom ideas, spent more than I would like to admit on Teachers Pay Teachers, and read countless articles on how to survive your first year teaching. I felt prepared. I left confident.
I wasn't.
After the first week of school, I started questioning if I could handle this. So, consistent with my routine, I did more research. I found a few articles on the emotional phases that a first year teacher goes through throughout the year. They were all pretty consistent. 


1. Anticipation = Sleepless nights pinning all of the adorable activities you MUST do in your future classroom.  Imagining the enormous, life-changing, Stand and Deliver-esque impact you are going to have on every student's' life. 
2. Survival = Working 12 hours days and still prepping through lunch break. Repeating "it has to get better, right?" and "how do the other teachers make it look so easy?"
3. Disillusionment = Open House, evaluations, and the realisation that things are not going as smoothly as I imagined. Your family, friends and significant other are starting to wonder if you'll ever have time for them again. Pressure. 
4. Rejuvenation = Maybe you had a breakthrough with that stubborn kiddo who is on your mind 24/7 or maybe you just really needed that Winter Break, but it's January and YOU CAN DO THIS.  If you're smart, you spent your break getting way ahead on lesson planning. If you're smarter, you relaxed, slept and planned for the first two weeks. 
5. Reflection = The end of the year is in sight. Most of the bad memories are fading and those special, warm & fuzzy teacher moment memories are floating through your head. You're thinking back on the victories and the major flops, what you'll differently next year (oh yeah, you're coming back for more), and those precious kiddos that stuck with you all year long. 

The first year of teaching- there is nothing quite like it and you can't really explain it until you're on the other side of it. But if you care enough to read this, if you care enough to try everything you can to make your class better, you can do this. You will make it. 

Tuesday, January 20, 2015

Teacher Journal

On my last day of student teaching, my cooperating teacher gave me an ordinary spiral notebook. She glued a name tag on the front and wrote my name in her perfectly cute handwriting. She told me to keep a journal of my first year teaching. It was a darling gesture, but secretly I thought, "ain't nobody got time for that!" I packed it away in one of the many boxes I had hoarded away for my first classroom. Two months later I got my keys and had 3 full days to set up my room. I didn't know much about my kiddos yet, but I figured out how to set up the tables and put up a couple cute things. Well.... then came the first day of school. Woah. What just happened. Did I eat? Did I pee? Who knows. I saw the Journal in a pile of stuff I still hadn't organized, but I didn't pull it out. If every day was going to be like the one I just had, there is no way in heck I'm going to have time to keep a journal. Next thing I remember was it was Friday after school. I got my kids on to the bus even if they were kicking a screaming. I sat in my desk chair and looked around at the pandemonium that was my once organized and cute classroom. I started reflecting on what worked and what didn't. I knew that some seat changes needed to happen and maybe a little furniture rearranging. I got the Journal out to sketch my class. I'm a visual gal and needed to map it out. Before I knew it I was jotting down memories and thoughts of how to be better prepared for the first few days next year. (Was is bad that I was already looking forward to next year??) This simple spiral notebook with my name on the front helped me reflect on my class, my students, and my self as a teacher. It helped me feel empowered that I could make positive changes and was in control of the chaos. It helped me when I needed a little encouragement or felt like leaving myself a love note. If you don't have one, I would highly suggest investing the $2 and few minutes it takes. I plan on having one for the foreseeable future.

Tuesday, January 13, 2015

Sensory Boxes

I would like to share a new love... Sensory Boxes! I admittedly haven't used a whole lot of sensory tools in class this year. We have a cool down kit with theraputty, a weighted blanket, a soft toy and an exercise ball, but that is about it. I have been looking for ways to add more sensory experiences to our day. We have been working on extending our time we can tolerate each of our academic centers. We started the year at 6 minutes per center MAX... not very effective for academics, but they are kinders and the transition from preschool can be hard. By the end of the first quarter we were at 10 minutes. Progress, but I knew they could do more! Towards the end of the second quarter, we could tolerate about 13 minutes. Over break I did some thinking and deciding on sensory breaks during centers, We don't have any independent centers, so I was able to put together some really fun sensory boxes without worry about kiddos dumping rice all over the place. I went to the dollar store and picked up rice, beans, feathers, marbles, army men, alphabet blocks, silly putty, tops, and other small toys. I filled up clear plastic bins with it all. I made 6 boxes (2 for each center) for about $40. The most expensive box by far was the theraputty box. I got 3 new tubs of theraputty in a variety of strengths, some bubber and silly putty.


We started using the boxes when we cam back from winter break. We do 15 minutes of work, play with the Sensory Boxes for 2 minutes, and then do 15 more minutes of work at the same center. 27 minutes per center! Now that the kiddos are getting used to the system, they are working so hard! The boxes are very motivating and give a good release. I can't wait to make more!

Sunday, January 11, 2015

Morning Work

In my most humble opinion, Morning Work is essential for a few reasons:
1. Its there, ready to go, every morning... consistency is key. It is predictable and helps mornings feel a little less hectic.
2. It sets a standard of work. When Morning Mork is set on the desk BEFORE the students arrive, it sets an expectation of work immediately as the students enter the classroom. I am at school. There is work for me on my desk. I am here to work.
3. It reviews multiple skills.
4. Its a mini daily assessment.

Long story short, I love Morning Work. This is one of the sheets I use with my lower kiddos. They need some hand over hand assistance to trace purposefully:
This is one of the sheets I use with my higher kiddos . We are getting away from hand over hand with most and some can trace independently now!


Both of these (and more!) are available on my TPT site

Welcome!!

Welcome to Kinder SPED Adventures! I am a Kindergarten (with a few 1st grade kiddos) Special Ed teacher in the Arizona desert. My students have mild to moderate intellectual disabilities and we are in a self-contained class. I love my job and creating hands-on, meaningful activities for my kiddos. I'm a coffee drinkin, mom of a toddler, and an on the fly teacher! Check in for activities and organizational tips!

Teachers Pay Teachers Store

Email

Instagram: kinderSPEDadventures